
Dissect the Adaptive Card
Before I take you through the main content of the blog, let’s do a quick look at the JSON for the Adaptive card and talk about which is what.Section 1: Header
"$schema": "http://adaptivecards.io/schemas/adaptive-card.json",
"type": "AdaptiveCard",
"version": "1.0",
"originator": "GUID"
This section is generated by default and the 2 noteworthy things for you to keep in mind is the ‘originator’ and version. ‘originator’ is a GUID which you will get when you register on the ‘Actionable Email Developer Dashboard’ portal. You can check out the portal here. More on this in the next blog. Another one is the version of the adaptive card. Some features may not work in one version. Please keep that in mind.
Section 2: Main Content
This is the first part of the “body” section which makes the UI of the card. In my case, I had a set of radio boxes and 2 text boxes: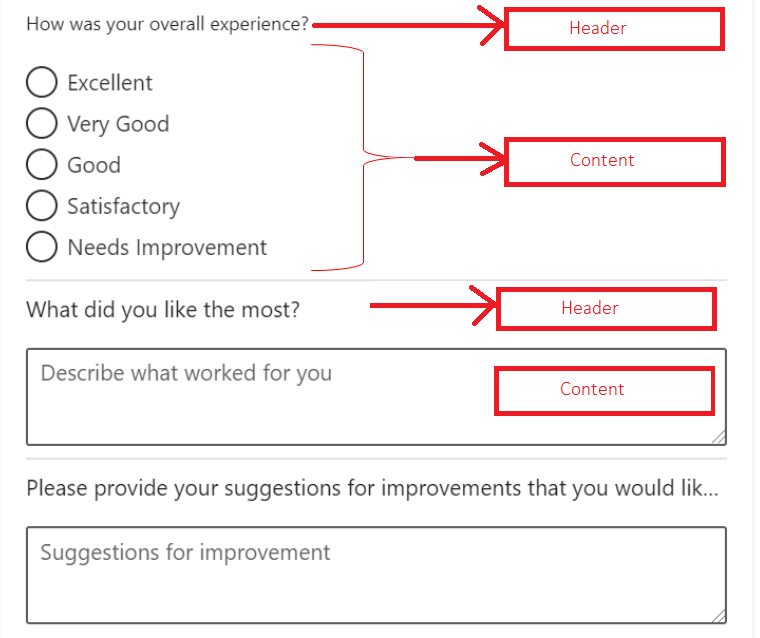 Every section is made up of a header and a content part. Below is the JSON snippet for the radio boxes section:
{
"type": "TextBlock",
"text": "How was your overall experience?",
"id": "lblRating",
"size": "Small"
},
{
"type": "Input.ChoiceSet",
"placeholder": "",
"choices": [
{
"title": "Excellent",
"value": "5"
},
{
"title": "Very Good",
"value": "4"
},
{
"title": "Good",
"value": "3"
},
{
"title": "Satisfactory",
"value": "2"
},
{
"title": "Needs Improvement",
"value": "1"
}
],

"id": "choiceRating",
"style": "expanded"

}
Section 3: Action
I had a button on click of which you can perform an action. In my case it was Action.Http. There are 3 more actions:a. Action.ShowCard: This is helpful when you need to show a card when a button is clicked.
b. Action.OpenUrl: This is when you want to take the user to a URL or a portal
c. Action.ToggleVisibility: You can toggle a collapsed section. Useful in scenarios when you want to display more information to the user.
Read more about the actions here. Below is the JSON snippet for my Action.Http:
{

"type": "ActionSet",
"actions": [
{
"type": "Action.Http",
"title": "Submit",
"method": "POST",
"url": "https://UrlToPost",
"id": "submitAction",
"style": "positive",
"body": "{  \n   \"WhatWorked\":\"{{txtBoxLiked.value}}\",  \n   \"Suggestions\":\"{{txtBoxSuggestions.value}}\",\n   \"Rating\":\"{{choiceRating.value}}\",\n   \"EventType\":\"%EventName%\"\n}",
"headers": [
{
"name": "Authorization",
"value": ""
},
{
"name": "Content-type",
"value": "application/json"
}
]
}
]
}
Explanation
If you look carefully, this is nothing different from what we do to post a request to an API endpoint. We are telling the action which verb to use to talk to API. In my case, it’s POST. Then we create the “headers”. If you are posting to Power Automate, then you need to make sure that “value” of “Authorization” header remains null or empty string. This is to do with the possibility avoid confusion with the existing authentication-authorization mechanism for the target endpoint. Actionable messages will then send the same bearer token via Action-Authorization header instead of using Authorization header. Lastly, we also send the “body” along with the post request to the API. In my case, I was using the same card to send feedback request for multiple events. But at the same time, we did not want to capture the event name from the participants. For that purpose, I had a magic string in the body of the adaptive card called “%EventName%”. When the Power Automate gets triggered, it used to extract the Event Name from the list item column. That column (EventName) value used to replace the said magic string dynamically before the card to sent to the user. With this, the card that reaches user will have the event name baked in it but hidden.How to Send the Card
I used Power Automate to send the card and the Power Automate was pretty simple. It used to perform following things:1. It was run manually by the organizer of the event
2. It used to extract the JSON (wrapped around <script type=”application/adaptivecard+json”> Adaptive card JSON </script>tag) kept in a separate list
3. From the item that it was run on, it used to extract the value of the Event Name column and replace the magic string, described in the last paragraph, with it.
4. It used to extract the users that attended the event from the item that it was run on and send email to all of them
You can use other means to send the Adaptive card. They can be custom APIs or O365 Connectors. In my next blog, I will take your through how to parse the submitted data, extract user details, and insert to a data storage.
Excellent article! We will be linking to this great post on our website. Keep up the good writing. Estele Xever Hazem
Well I really liked studying it. This subject offered by you is very effective for proper planning. Pansy Shaughn Arther
Appreciation to my father who informed me about this website, this weblog is actually remarkable. Violet Gregorius Pfeifer
I would like to thank you for the efforts you
have put in writing this website. I really hope to see the same high-grade content by you later on as well.
In truth, your creative writing abilities has encouraged me to get my very own site
now 😉
Howdy very nice website!! Man .. Excellent .. Superb
.. I will bookmark your blog and take the feeds also?
I am satisfied to find so many helpful information right here in the post, we want work out more techniques
in this regard, thank you for sharing. . . . . .
WOW just what I was looking for. Came here by searching for website
Very descriptive blog, I loved that a lot. Will there be a part 2?