
This is part 2 of the blog series on developing Actionable message with Adaptive card. You can read the part one here. In this blog, I am going to talk about how to create the message and use it.
How Actionable Messages Work
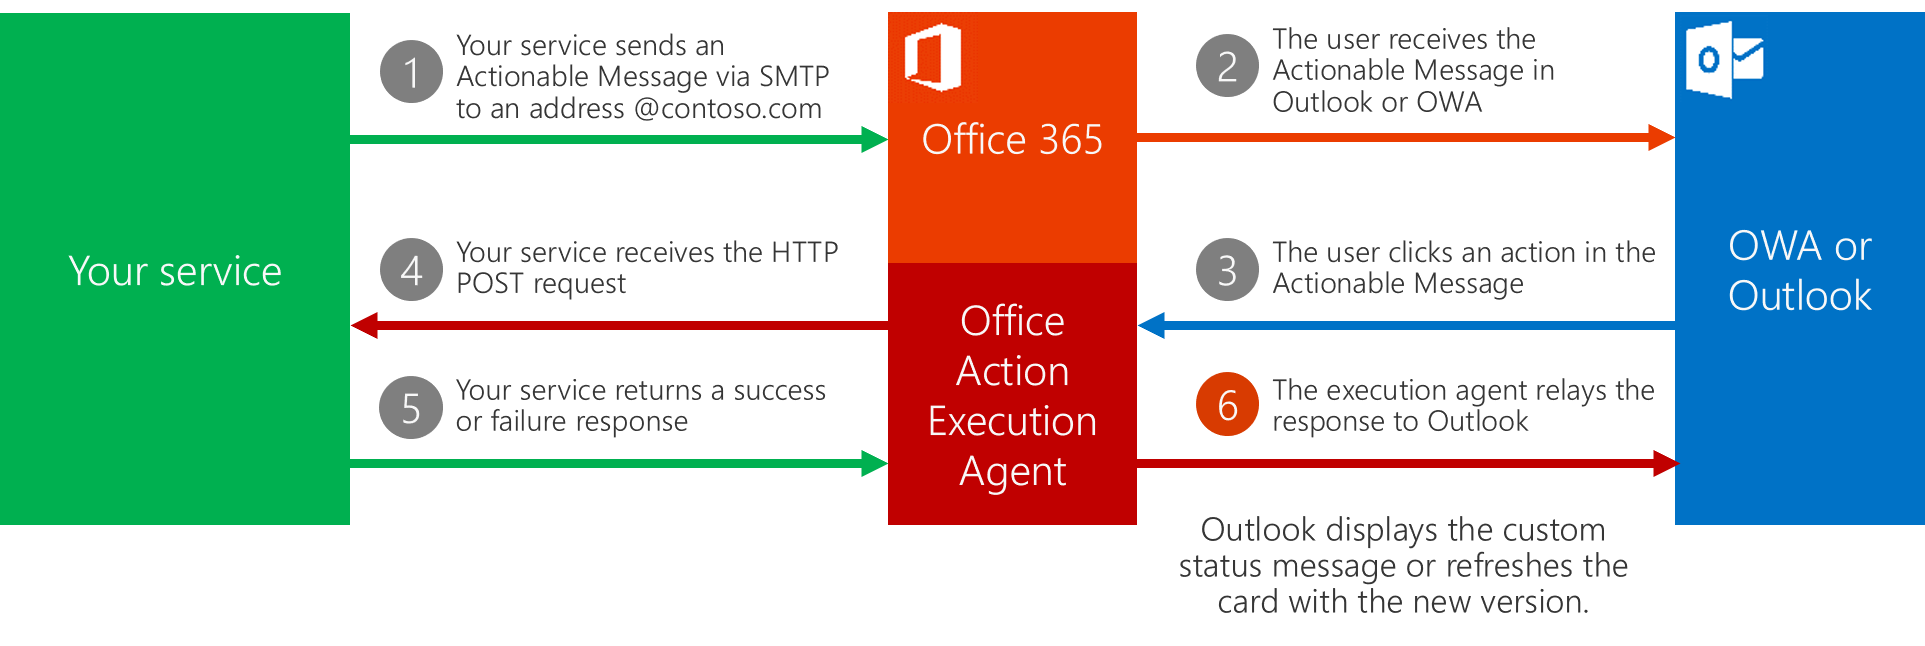 Source: Microsoft Ignite presentation
These are the things that you want to keep in mind while you have taken the decision to go ahead with the actionable card:
1. Figure out how do you want to send it:
a. Via email: You can use the (new) adaptive card to design the card. I am going to take you through this use case.
b. Via connectors: Connectors only use legacy MessageCard format for cards and not use Adaptive card format.
2. Finalize if your users will be able to see them. Actionable messages have limitations; card will not load if the user email, device combination is not supported. If you are sending the card via email, like in my case, then below are the supported scenarios:
a. The recipient must be an individual, not a group.
b. The recipient must be visible on the message. Do not put the recipient in the BCC field.
c. The recipient must have a mailbox on Outlook.com or Exchange Online in Office 365.
d. There are restrictions on the version of Outlook app on the device (Windows, iOS, and Android) used
3. Design your card UI based on available controls.
Now once you have taken care of all the prerequisites and ready to go, you can head to Card Playground to design your card. There are some pretty cool cards already created as sample and they can be a good starting point. While you add your UI elements from the top of the page, it will generate the JSON at the bottom which you need to use. This is the JSON for my card:
{
    "$schema": "http://adaptivecards.io/schemas/adaptive-card.json",
    "type": "AdaptiveCard",
    "version": "1.0",
    "originator": "GUID-THAT-YOU-WILL-GET-AFTER-APPROVAL",
    "body": [
        {
            "type": "TextBlock",
            "text": "How was your overall experience?",
            "id": "lblRating",
            "size": "Small"
        },
        {
            "type": "Input.ChoiceSet",
            "placeholder": "",
            "choices": [
                {
                    "title": "Excellent",
                    "value": "5"
                },
                {
                    "title": "Very Good",
                    "value": "4"
                },
                {
                    "title": "Good",
                    "value": "3"
                },
                {
                    "title": "Satisfactory",
                    "value": "2"
                },
                {
                    "title": "Needs Improvement",
                    "value": "1"
                }
            ],
            "id": "choiceRating",
            "style": "expanded"
        },
        {
            "type": "TextBlock",
            "text": "What did you like the most?",
            "id": "lblLiked",
            "separator": true
        },
        {
            "type": "Input.Text",
            "placeholder": "Describe what worked for you",
            "id": "txtBoxLiked",
            "isMultiline": true
        },
        {
            "type": "TextBlock",
            "text": "Please provide your suggestions for improvements that you would like to see",
            "id": "lblNotLiked",
            "separator": true
        },
        {
            "type": "Input.Text",
            "placeholder": "Suggestions for improvement",
            "id": "txtBoxSuggestions",
            "isMultiline": true
        },
        {
            "type": "Input.Text",
            "placeholder": "Placeholder text",
            "isVisible": false,
            "value": "Event A",
            "id": "txtBoxEventType"
        },
        {
            "type": "ActionSet",
            "actions": [
                {
                    "type": "Action.Http",
                    "title": "Submit",
                    "method": "POST",
                    "url": "https://UrlOfThePowerAutomateinstanceEndPoint",
                    "id": "submitAction",
                    "style": "positive",
                    "body": "{  \n   \"WhatWorked\":\"{{txtBoxLiked.value}}\",  \n   \"Suggestions\":\"{{txtBoxSuggestions.value}}\",\n   \"Rating\":\"{{choiceRating.value}}\",\n   \"EventType\":\"%EventName%\"\n}",
                    "headers": [
                        {
                            "name": "Authorization",
                            "value": ""
                        },
                        {
                            "name": "Content-type",
                            "value": "application/json"
                        }
                    ]
                }
            ]
        }
    ]
}
View on github.
My card has a Submit button which is essentially Action.Http which lets you call a service endpoint when user clicks on it. In my case, I have a Power Automate endpoint that I am using. More on this in my next blog.
